27 February, 2013

• Create your WiFi Hot-Spot


WiFi hotspot can broadcast internet data as a WiFi, and another WiFi supported devices can access that WiFi data. This is a same data broadcasting facility as a Router device, which enables internet access through air. You can create your own WiFi Hot-Spot in your Android device. So, you or your friends can use your Internet Data in their WiFi supported devices like Mobile, Tablet, Laptop etc. Before this, you must have to activate GPRS/Data Service Pack. You have to start data plan from your service provider in an  Android phone in which you are creating a WiFI hotspot. So, follow the following steps and enjoy with your friends.


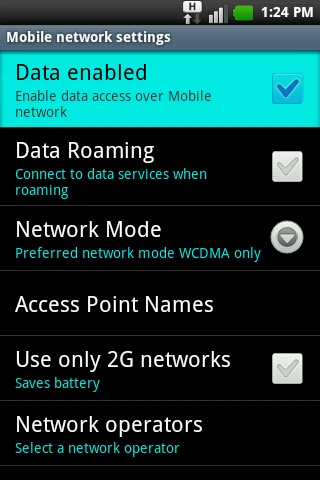
Here are the steps that will show you that how to create WiFi hotspot & how to use it in other devices Go to "Settings" in your phone and then go to "Wireless and Networks". Then after, click on "Mobile Network Settings". If Data access over Mobile Network is disabled, do Enable data access over mobile network. Go back and click on "Tethering & Portable Hotspot". After that Enable "Portable WiFi Hotspot" option. Then click on "Portable Wifi hotspot Settings" for more advance options. In a newly open window screen, click on "Configure WiFi hotspot". It will open a new window to add custom settings. Enter any name in "Network SSID".
Now there will be two options for Security.
     i. WPA2 PSK
     ii. Open
  If you want your WiFi Hotspot password protected, select WPA2 PSK and set Password in next "password" box. So, anonymous access will be controlled by password.  If you select Open option, there will not be any password and anyone can use your WiFi hotspot. Now your WiFI Hotspot created and is ready to use.


  You can select your custom time to disable WiFi hotspot automatically. This option will stop broadcasting WiFi when it is not connected with any device for your selected time-gap. For that, select time from given time options in "Timeout".


To get connected with other device, follow these steps:
  Turn On WiFi option in the other device in which you want to use internet from WiFi hotspot. In that device, scan all available WiFi & Select WiFi hotspot to use internet. Then enter password if it is password protected. Enjoy !!! :)

[! Setting steps here are described according to the Gingerbread version. In other versions, settings path might be same or different. ]
[! Using WPA2 PSK WiFI Hotspot is advisable as it'll stop unauthorized access of your GPRS data.
[! Don't turn ON your "WiFi" option in your mobile while you are broadcasting your WiFi to others. Otherwise WiFI hotspot will be deactivated. ]
 

12 January, 2013

• Hide / Protect files : No Application required


By this trick, you can hide files without use of any application. You can hide media files like Songs/Recordings(Mp3, wav...), Videos(mp4, 3gp, avi...), Images(jpeg, jpg, gif, png...) etc. in your Android Device. This will also helpful to you to protect your private & secret files.

For this trick, you will need a file. ".nomedia" is a file, which is used to hide such media in Android phone. You can get this file by clicking here - Create .nomedia file.

A ".nomedia" file is a blank file, placed inside a folder. When the Android media scanner detects the .nomedia file in any folder, Android media scanner does not scan media files(sound, video & image) from that folder. So the images, songs or videos in that folder don't appear in the Gallery or Video/Music player.

Follow these steps to hide & protect media files:
Firstly, get or create ".nomedia" file.

Open file manager in your Android. Create a new folder or go to your created folder.

Paste your Private Images, Videos, Songs, Call recordings, Recordings etc. in that folder. Means, paste those files in the folder, to which you don't want to display in your gallery.

Paste .nomedia file in that folder. (Click here to create .nomedia file.)

Done!! Those media files will not appear in Gallery, Music Library or Video Player.

Here, such media files are not encrypted or converted in other formats. They are just skipped from scanning by Android. If you use any other kind of "Media Hiding Apps", those apps will encrypt/convert media files & we can't open them directly.

But files, hidden by this trick, will always appears and can be opened in your file manager and other systems. To overcome this problem, place the folder in some other folders with different name.  This will be also one kind of hiding & protecting trick.


[! If you remove .nomedia file from the folder, those files will be appeared in Gallery or Music/Video player. ]
[! Such hidden files will still appear in File Manager and in PC. Those files will be hidden only in Android Gallery & Music Players. ]
[! You cannot hide files like Text file, Documents, Pdf, .apk, etc. by this trick. ]

Other Related posts:
Call block : No application required
Make Android Faster
Create portable WiFi Hot-spot
Create .nomedia file

• Create ".noMedia" File


Default applications in Android like Photo Gallery, Android MP3 Player, Android Video Player will display all the photos, songs & videos from all of the folders in your device. But if you add ".nomedia" file in any folder, the media content of that folder will be disappear from the Gallery/Player.

".nomedia" is a simple blank file to hide pictures, songs & videos in Android based phone/tablet. ".nomedia" file will let you to Hide media files without installing any other application.
So start hiding your personal, private or confidential media files in your Android phone by just creating a ".nomedia" file.

Here are two simple methods to create a .nomedia file.

>>>  Method-1  <<<
(Direct Copy this file from another pre-installed Application in your phone.) 
Open File Manager in your Android phone that you have installed.
Simply go to ../sdcard/Andriod/data/ 
In this folder, there will be a ".nomedia" file. Copy this ".nomedia" file.   
Then create a new folder or open your any media folder & paste ".nomedia" file in that folder in which you want to hide your private/important media files.

>>>  Method-2  <<<
(Create file by Notepad in your PC.) 
In your Windows OS, go to Start Menu » All Files » Accessories » Notepad to open notepad.
After opening notepad file, don't write anything in that file. Just leave it totally blank, not even any space or symbol.  
Then in notepad Menu-bar, go to "Save As" option.  
In Save as Dialog Box at bottom, select "All files (*.*)".  
To give a name for this file, type .nomedia and click on Save.
Your ".nomedia" file is ready and copy this file into your phone.

Click here how to use ".nomedia" file to hide media files without use of any application. 
[! Created .nomedia must be blank in thumbnail view as shown in above image. ]

Click Here for use of ".nomedia" file and more information about that.

You can download ".nomedia" from a link here given at below... !!
Direct Download link (.nomedia file)

Other useful Blog-posts.....
  Long Battery Life
  Share your Internet by creating WiFi Hot-Spot
Android Version Image/Animation
Add your favorite Ringtones for Incoming Calls
 

29 December, 2012

• Change Menu Bar Icon

Any icon can be added to the home-screen for fast access.
Like that, any app icon can be added to default home-screen Menu bar at bottom.
If any app is very useful or needs to be open frequently, then you can add it to the Menu bar. Here it is,

1. Go to your Application list.

2. Press and hold any desired app, which you want to add to the menu bar. After holding any icon, home screen will be displayed.
[ Here, I want to replace Contacts by Gallery. ]


4. Drag the icon to the Menu bar and put on other existing icon to which you want to replace.
[ Drag Gallery icon to the Contacts Icon and release hold from Gallery icon. ]

5. Releasing hold from that icon, it will be added to the status bar as shown in the below image.
[ Contacts icon will be replaced by Gallery. ]

[! By replacing any icon from Menu Bar, will not remove that app. It will replace just an icon which can be added again by above same steps. ]


19 December, 2012

• Icon Info

Now Contact Icons are more informative.

Android has added more informative Icons which will allow us to save our time and let us to see and access all the relevant information of any of stored contact from one click Icon.

By one click on the contact icon, user can have all the stored information of particular contact on the screen display in one lined symbol view.

You can access directly Call, Message, Email, Website, GTalk, Google Map etc. services from contact icon.

[! But remember one thing that you must have stored relevant information like Call number, website, IM ID/link, Address location etc. in the contact. ]

Let's see how to do it. It's very simple...

1. Open Contact List, Message Box, Call Log or other app which contains icons from your contact information.

2. Press that icon, it'll display more basic symbols in one lined box, according to the info stored in that particular contact.

3. Than press any of the symbol which you want to access from it.

4. If any symbol contains multiple info for same type of symbol, it will enlist all those info in another box.

Here are steps for above tip, which are containing stepwise images by Contact List Example.

1. Open Contact list and go to your desirable contact.

2. Press the icon of that contact.


3. Than press on any of symbols which you want to access. Here, For calling purpose, press Calling symbol.

4. If calling numbers are more than one in contact info, it will display list of them all.

11 December, 2012

• Multi-use Volume Key

We want to use many things in our mobile without accessing Menu list or without unlocking Screen Lock.
Some of short cuts are also available in our smart phones directly with hard keys.


Here are few uses of Up-Down Volume Keys of Android phone :

* Silent Caller Ring :- During Incoming calls, you can silent caller Ringtone for the call at that time only by simply pressing any of Volume keys.
[ Suppose, in a meeting/tuition/function, you forgot to silent your phone and if any incoming call is there, press volume key in your pocket from outside to silent the phone. ]
[! This Trick will not change to Silent/Vibrate Profile. ]

* Profile Change :- Change profile mode like General, Vibrate or Silent by volume keys. Up volume key for General mode. Down volume key for Normal, Vibrate or Silent mode.
[! This will not work while  any call is running and also when any Game or Media is being played.]

* Song Volume :- Volume of Song-Music file can be change also when phone screen is locked. It can be also changed in general mode use.

* Media Volume :- When any media (Song, Video... ) is running, you can change sound level of that media.

* Game volume :- Game music can be changed or adjusted by volume keys while playing.

* Zoom In/Out :- Adjust Zooming level in camera by volume keys.

* Click to Photo :- Photos can be taken by pressing any of the volume keys by Camera.
[! This option is only available with proper settings in some Camera applications, not in all. ]

* Screen Shot :- In latest versions of Android, Screen shot can be taken by volume key + power button.

* Call Volume :- Change volume level of opponent caller during call by volume keys.

* Different uses :- There can be different uses of volume keys by few applications, which allows us to assign desired functions to these keys.

➤ Related Post by Labels

Android (22) Custom (2) Information (10) Restart (5) Tips (5) art (2) battery (2) cache (2) call (3) caller tone (2) data (1) fast (5) gallery (3) hidden (2) hide (2) icon (4) info (4) longtime (2) memory (2) multi (3) nomedia (2) notification (2) performance (2) quick (5) reboot (3) storage use (2) trick (2)