29 December, 2012

• Change Menu Bar Icon

Any icon can be added to the home-screen for fast access.
Like that, any app icon can be added to default home-screen Menu bar at bottom.
If any app is very useful or needs to be open frequently, then you can add it to the Menu bar. Here it is,

1. Go to your Application list.

2. Press and hold any desired app, which you want to add to the menu bar. After holding any icon, home screen will be displayed.
[ Here, I want to replace Contacts by Gallery. ]


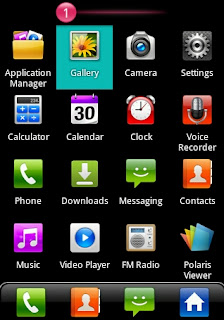
4. Drag the icon to the Menu bar and put on other existing icon to which you want to replace.
[ Drag Gallery icon to the Contacts Icon and release hold from Gallery icon. ]

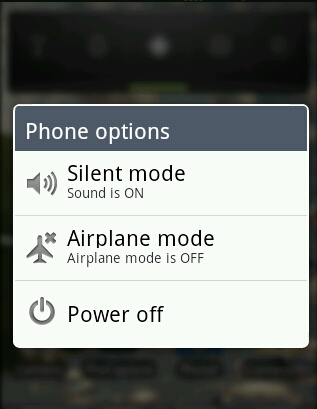
5. Releasing hold from that icon, it will be added to the status bar as shown in the below image.
[ Contacts icon will be replaced by Gallery. ]

[! By replacing any icon from Menu Bar, will not remove that app. It will replace just an icon which can be added again by above same steps. ]


19 December, 2012

• Icon Info

Now Contact Icons are more informative.

Android has added more informative Icons which will allow us to save our time and let us to see and access all the relevant information of any of stored contact from one click Icon.

By one click on the contact icon, user can have all the stored information of particular contact on the screen display in one lined symbol view.

You can access directly Call, Message, Email, Website, GTalk, Google Map etc. services from contact icon.

[! But remember one thing that you must have stored relevant information like Call number, website, IM ID/link, Address location etc. in the contact. ]

Let's see how to do it. It's very simple...

1. Open Contact List, Message Box, Call Log or other app which contains icons from your contact information.

2. Press that icon, it'll display more basic symbols in one lined box, according to the info stored in that particular contact.

3. Than press any of the symbol which you want to access from it.

4. If any symbol contains multiple info for same type of symbol, it will enlist all those info in another box.

Here are steps for above tip, which are containing stepwise images by Contact List Example.

1. Open Contact list and go to your desirable contact.

2. Press the icon of that contact.


3. Than press on any of symbols which you want to access. Here, For calling purpose, press Calling symbol.

4. If calling numbers are more than one in contact info, it will display list of them all.

11 December, 2012

• Multi-use Volume Key

We want to use many things in our mobile without accessing Menu list or without unlocking Screen Lock.
Some of short cuts are also available in our smart phones directly with hard keys.


Here are few uses of Up-Down Volume Keys of Android phone :

* Silent Caller Ring :- During Incoming calls, you can silent caller Ringtone for the call at that time only by simply pressing any of Volume keys.
[ Suppose, in a meeting/tuition/function, you forgot to silent your phone and if any incoming call is there, press volume key in your pocket from outside to silent the phone. ]
[! This Trick will not change to Silent/Vibrate Profile. ]

* Profile Change :- Change profile mode like General, Vibrate or Silent by volume keys. Up volume key for General mode. Down volume key for Normal, Vibrate or Silent mode.
[! This will not work while  any call is running and also when any Game or Media is being played.]

* Song Volume :- Volume of Song-Music file can be change also when phone screen is locked. It can be also changed in general mode use.

* Media Volume :- When any media (Song, Video... ) is running, you can change sound level of that media.

* Game volume :- Game music can be changed or adjusted by volume keys while playing.

* Zoom In/Out :- Adjust Zooming level in camera by volume keys.

* Click to Photo :- Photos can be taken by pressing any of the volume keys by Camera.
[! This option is only available with proper settings in some Camera applications, not in all. ]

* Screen Shot :- In latest versions of Android, Screen shot can be taken by volume key + power button.

* Call Volume :- Change volume level of opponent caller during call by volume keys.

* Different uses :- There can be different uses of volume keys by few applications, which allows us to assign desired functions to these keys.

05 December, 2012

• Make Android more Faster


Performance of mobile device depends on many things. All the software and hardware parts are integrated with each other to have best performing device.

Here are few steps by which you can make your Android device performing better.

* Less App :- Many applications means they will occupy more space in storage, use more RAM and use more Battery power. So, remove unnecessary apps from mobile.

* Task Optimizer/Killer :- Such application will stop/pause processes which are not in current use. Use light weight task killer.

* Cache Clean up :- This will remove useless and temporary files from storage and free up some memory in our memory card and phone memory. Here are the steps to clean up cache.

* Live Wallpaper :- In some devices, live wallpaper uses much RAM and slows down the performance of the device. Generally problem occurs in home screen while sliding screens. So, again use light weight live wallpaper or Static Image wallpaper.

* Move to SD Card :- Moving applications to SD card is one of the best thing to increase your device's performance. Click to move apps to your memory card.

* Restart :- Restart option is also very useful to the any device like sleep in our life. It'll be a fresh and smooth feelings to us to use mobile. At-least Restart mobile in every week.

* Application :- Use such kind of apps that will not keep running continuously whole day. It will constantly use battery and RAM. For example, Antivirus, GPS\Location, Application Hider etc. Such kind of apps will run through out the day.
 
* Paid App :- (Not friendly option but... ) Paid applications are proper programmed to run in mobile with low battery and low RAM consumption than free one.

Moreover, you can run your device's battery for longtime. To see how?, click here.

30 November, 2012

• Free up Memory from Cache

Applications have so many files. Many of them are important and some are useless. All the applications create Temporary files during their general processes. All these files are called Cache. Caches are mostly useless after their use in many cases. Small size of caches but in large amount, uses much amount of space in our Physical or Dynamic Storage. So, during specific period of time, we have to delete those caches. It will free up some free spaces in storage slot and it will let our device to perform better and smoothly due to having free space.

Here are the steps to delete Caches in our Android device : Press "Menu" and then "Setting" from Menu list.  Go to "Applications" in list of setting.  There will be "Storage Use" in Application Menu, Click it. It will displays the list of Installed Applications in an Alphabetical order.  In this window, Press "Menu" Button and then press "Sort by Size". It will rearrange all the apps according their size and shows applications which are occupying more space.  Click on any application from which you want to delete Cache.  There will be button named "Clear Cache". Click this button on free your device's memory.


[! "Clear Cache" will not delete User stored Data from application. ]
[! In same window, "Clear Data" option is also available, which will delete all caches along with all User Saved Settings. Application will become fresh as it was newly installed by "Clear Data". ]

Other posts related to free up memory from cache files of Gallery & User Installed Applications.
Delete Large Amount Cache from Gallery
Reset Application & Free up memory
Make Android more Faster and Smoother
Gallery Image Sliding Fun

• Call Block without App

Block your unwanted calls without any Application.

>> Block Particular Calls
>> Block All Calls

There is a Call Blocking facility in all Android Devices by default.
You can add contact numbers in a Black List from whom you don't want to receive call.
Unwanted Friends, Advertisement/Service Call can be blocked by this Android facility.

To use this trick, you would have to following steps.
I have explained call-blocking process step by step with Screenshots to understand better.

1. Press "Menu" key to show menu list and press "Setting" from list.


2. In setting list go to the "Call Settings" and in Call Setting list go to "Call Reject" option.


3. In Call Reject menu, press "Call Reject" drop-down menu.

4. From Drop down List choose "Reject On List".


5. Then click on "Call Reject List" which will be your Call Black List.

6. In that window, press "Menu" button and then click "Add New Number".


7. A new window will be displayed as follow. Click any one option from you wish to block number.


After this process, numbers in your Call List(Black List) will be hanged on.

8. If you want to block All incoming Calls, just click "Reject All Calls".


9. To Remove particular number from black list, you will have to remove that number from call list.

10. If you do not want to any Call blocking, just go to "Call Reject" and click on "Off". All calls will be regular as before.

• Version Art (PlatLogo)


Every Android versions like Gingerbread, Honeycomb, Cream Sandwich etc. have one simple or animated  logo/image/art.

Zombie Art in Gingerbread

This image is hidden under 'Setting' option in your device.

[! Here, displayed image is of Gingerbread version. It will be different in Other versions.]

Here is one example for Gingerbread Android Version.
This is also applicable to other versions of the Android.
To show that image, just follow steps.

1. Press "Menu" button from your home-screen.

2. Press "Setting" option.

3. Then scroll setting page to the end. There press "About Phone".

4. Under "About Phone" menu, there is a unpressed link "Android Version". Which will show you your device's current Android version.

5. Press continuously in speed "Android Version" icon.

6. By keeping up pressing continuously in speed, it will display an image for Gingerbread as above.

[! Generally image will display after 4-5 continuous clicks. If not, then keep pressing fast until it displays.]

Click here to see video.


29 November, 2012

• Move Apps to SD Card without App

While installing apps in mobile, most of applications are by default installed in Phone memory. This causes Low Phone Memory Problem and Slower the performance.

Here are some basic steps to move installed applications to your SD/Memory Card.

1. Press "Menu" and then "Setting".

2. Go to "Applications" in Setting list.


3. Then click on "Storage Use" menu. It will displays all installed apps in Alphabetical Order.

4. Among different Tabs at top, choose "On SD Card". Here, it will shows you all the apps which are able to move to the SD Card.


5. Click on the Application which you want to move to SD card. It will show details of that app.

6. Then press "Move To SD Card". Your application's data will be shifted to Memory Card.


[! This will not affect any of data of the application. ]

[! After this steps some basic files will still remain in Phone Memory which can be ignored. ]

[! Above steps are based on 2.3 Gingerbread version. In other versions, steps to this solution might be differ. ]

[! Some applications are programmed to install only and only in Phone Memory. So many Android pre-installed applications and other few apps will be Unable to move into SD card. ]

[! Above steps are the basic steps to move applications to the SD card. You can also use other applications which offers facility to move your installed apps to SD card. ]

27 November, 2012

• Change Profile by Volume Key


Generally we have to deal with General Profile Mode and Silent/Vibrate Mode in our mobile.
Many people change profile from notification bar or by # key.


But now-a-days many mobiles are facilitate with Side Volume Key Profile Change facility.


* To Switch from General mode to Vibrate/Silent mode, just hold down Lower Volume Key. It will Activate your Vibrate mode.
By Pressing Volume Keys


* To Switch from Vibrate/Silent mode to General mode, just hold down Upper Volume Key. It will Activate your General mode.

* You can also adjust your Profile volume to medium mode by pressing Volume Keys.

[! This will not work when any Game or Song is being played. ]


• Mobile Hang???

Sometimes our Android mobile gets Hang/Jam.
Power Button at Top or Top-Right
Any of the keys do not work and at the end we remove battery of the device.

But you can manage with this situation... ☺

* Press "Power" button and hold up that button until your mobile gets restart.

[ or you can Wait until mobile gets automatically restart. :) ]


• Android Zombie Art


This will be viewed in Gingerbread version. In other versions, it will be different.

• Fast Restart


Sometimes it is urgent to Re-start our Android/Smartphone quickly. Here, there is a tip to do your mobile quick restart by saving half of normal restart.

[* Putting out your mobile`s battery while your mobile is on may affects your mobile and also to the Android OS, don't remove battery to do quick restart. ]

Shutdown Screen


* Normally all the Android phones have Power Button at Top or Top-Right. Use this button to do quick   restart your device.

* Press and Hold this button for 4 to 5 seconds.

[! During this it will shows you a Shutdown screen. Do not press any option from them. Just keep holding this button until your device doesn't get off. ]

* :) You are done now.

• Custom Alarm


Listen your own favorite Alarm with your Clock Alert. Now you can also add your favorite  downloaded soft wishing Good morning tones, tunes, tracks etc. in Default Alarm Chooser list. During any types of Alarm, you can play whatever you want. By this post, you can add your favorite tracks in Android Alarm List. So just follow these steps and enjoy....


Open any File Manager in your Android phone. 

Create a new folder & name it as "Alarms".


After this, just add/copy-paste your favorite music files/tones in this folder. 

Open your Clock Alarm Picker List for clock/time settings, and select your added one tune. Done!

If your added tones do not appear in your Alarm List, then Restart your device once or change folder's name to alarms (lower case).
Do not add ".nomedia" file in this Alarms` folder. Otherwise tunes will be hidden from Alarm Picker list.
Your custom added files will not display in Music Player's Library.

For adding customized favorite Notifications and Ringtones, there are also tricks available in this blog. :)

Other Related posts:
Set your Custom Ringtone
Set your Custom Notification

• Custom Notification


Listen your own favorite Notification with Incoming Message or Alert. Now you can also add your favorite  downloaded songs, tones, tunes, tracks in Default Notification Chooser list. During any incoming text messages, e-mails or any other types of notifications, you can play whatever you want. By this post, you can add your favorite tracks in Android Notification List. So just follow these steps and enjoy....

Open any File Manager in your Android phone. 

Create a new folder & name it as "Notifications".


After this, just add/copy-paste your favorite music files/tones in this folder. 

Open your Notification Picker List for Incoming messages, e-mails etc. from their related settings, and select your added one tune. Done!

If your added tones do not appear in your Notification List, then Restart your device once or change folder's name to notifications (lower case).
Do not add ".nomedia" file in this Notifications` folder. Otherwise tunes will be hidden from Notification Picker list.
Your custom added Notification files will not display in Music Player's Library.

For adding customized favorite Alarms and Ringtones, there are also tricks available in this blog. :)

Other Related posts:
Set your Custom Ringtone
Set your Custom Clock Alarm

• Custom Ringtone


Friends, now you can add your downloaded songs, tones, tunes, tracks in Default Ringtone Chooser list. During any incoming call, you can play whatever you want. By this post, you can add your favorite tracks in Android Ringtone List. So just follow these steps and enjoy....

Open any File Manager in your Android phone.

Create a new folder & name it as "Ringtones" as shown below in an image. 

After this, just add/copy-paste your favorite music files/ringtones in this folder

Open your Ringtone Picker List for Incoming calls from Call Settings, and select your added one tune. Done!

If your added ringtones do not appear in your Ringtone List, then Restart your device once or change folder's name to ringtones(lower case).
Do not add ".nomedia" file in Ringtones` folder. Otherwise they will be hidden from Ringtone Picker list.
Your custom added Ringtones will not display in Music Player's Library.

For adding customized favorite Alarms & Notifications, there are also tricks available in this blog. :)

Other Related posts:
Set your Custom Notification
Set your Custom Clock Alarm

• Quick Restart

Sometimes it is urgent to Re-start our Android/Smartphone quickly. Here, there is a tip to do your mobile quick restart by saving half of normal restart.

[! Put out your mobile`s battery while your mobile is on may affects your mobile and also to the Android OS, don't remove battery to do quick restart. ]

* Normally all the Android phones have Power Button at Top or Top-Right. Use this button to do quick   restart your device.

* Press and Hold this for 4 to 5 seconds.

* During this it will shows you a Shutdown screen. Do not press any option from them. Just keep holding this button until your device doesn't get off.

* :) You are done now.

➤ Related Post by Labels

Android (22) art (2) battery (2) cache (2) call (3) caller tone (2) Custom (2) data (1) fast (5) gallery (3) hidden (2) hide (2) icon (4) info (4) Information (10) longtime (2) memory (2) multi (3) nomedia (2) notification (2) performance (2) quick (5) reboot (3) Restart (5) storage use (2) Tips (5) trick (2)